![]()
![]()
bOOTrOOT makes the development, construction, and testing of distributions fun and simple.
Newest version
1.3.5 available in tar.gz, deb, and rpm formats.
Main repository:
http://prdownloads.sourceforge.net/gbootroot/
Milestone version 1.3.1 dedicated to the first ever
MORLUG meeting in my
hometown!
Slackware or just doing it by hand
gbootroot source
Instructions:
README and type make to install
Debian based distributions
gbootroot debian package
Instructions:
apt-get --yes install gbootroot or dswim -qxyz gbootroot
after adding these lines to your sources.list:
deb http://prdownloads.sourceforge.net/gbootroot ./

deb http://prdownloads.sourceforge.net/avd ./
RPM based distributions
Mandrake and Mandrake-type distributions
Red Hat and related distributions
Instructions:
Mandrake-type distribution require perl-GTK >= 0.7002
Red Hat type distributions require Gtk-Perl >= 0.7002
All RPM based distributions require perl-Expect and friends available from the main repostiory:
perl-Expect
perl-IO-Tty
perl-IO-Stty
Other requirements include:
file

ash

lilo

bzip2
Add-ons
Debian based distributions
make-debian-x11 source (type make to install)
make-debian-x11 debian package

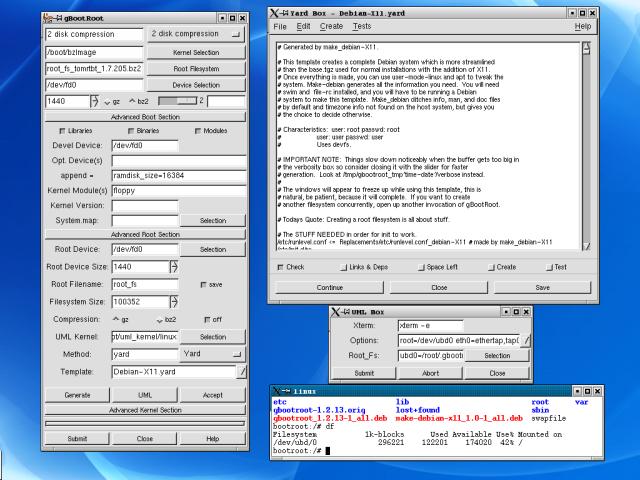
How to Use gBootRoot's UI
 The most important button to
familiarize yourself with is the Submit button which starts the whole process;
dialogs are presented as the process continues asking you if you want to
continue "OK" or stop "Cancel".
The most important button to
familiarize yourself with is the Submit button which starts the whole process;
dialogs are presented as the process continues asking you if you want to
continue "OK" or stop "Cancel".
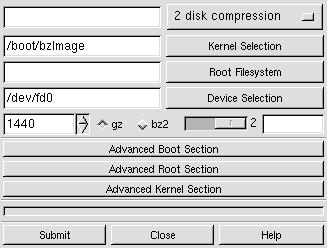
The first row allows you to choose a Boot Method. Clicking on the menu on the right selects the Boot Method.
The second row allows you to select the kernel for the Boot/Root set. You may either use the file selector button on the right hand side, or you may type in the location on the left hand side.
The third row allows you to select the compressed filesystem you are providing, using either of the two ways mentioned before. You may use a pre-made root filesystem or you may create one using one of the Methods provided in the Advanced Root Section.
The fourth row allows you to select the device you want to use. The default device is the first floppy disk - /dev/fd0.
The fifth row allows you to choose the size of the device being used. The default size of 1440 assumes you are using a floppy drive (Note: You may want to experiment with 1722 which works fine with many floppy drives.), but can be used with other sized devices like tape drives. Click on the appropriate radio button to choose either gzip or bzip2 compression if the program doesn't automatically detect it.
Verbosity Box
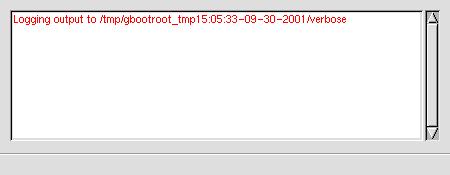 The slider bar on the right allows the output of the verbosity box
to be
changed from the highest (2) to the lowest setting (1) or to be turned off (0)
or on again. At times it may be advantageous to turn off the
verbosity box
since large quantities of output to this box may cause gbootroot to use too
much cpu power; however, output may still be found in the text file "verbose"
in /tmp/gbootroot_tmp'time-date' or /tmp/gboot_non_root_`id -u` for
normal users.
The slider bar on the right allows the output of the verbosity box
to be
changed from the highest (2) to the lowest setting (1) or to be turned off (0)
or on again. At times it may be advantageous to turn off the
verbosity box
since large quantities of output to this box may cause gbootroot to use too
much cpu power; however, output may still be found in the text file "verbose"
in /tmp/gbootroot_tmp'time-date' or /tmp/gboot_non_root_`id -u` for
normal users.
Using the Advanced Boot Section
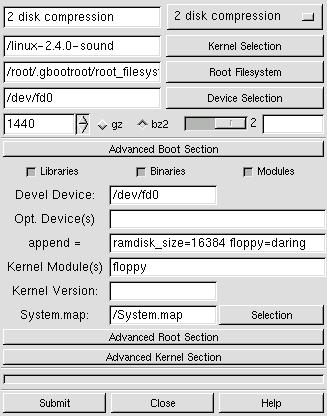 Libraries & Binaries & Modules check boxes: Turn off and on the
stripping of symbols. The stripping
behavior for libraries may be changed by clicking on the right mouse button
to change --strip-debug to --strip-all. Binaries default to
--strip-all and Modules default to --strip-debug.
Libraries & Binaries & Modules check boxes: Turn off and on the
stripping of symbols. The stripping
behavior for libraries may be changed by clicking on the right mouse button
to change --strip-debug to --strip-all. Binaries default to
--strip-all and Modules default to --strip-debug.
"Devel Device" If the device used for development is different than the actual boot device, use this field to indicate that device. You will have to run lilo -v -C brlilo.conf -r "device mount point" manually at a later time on the actual boot device.
"Opt. Device" Add devices to the boot disk which are necessary for the kernel to function properly. Put a space between each device. For instance, /dev/fb0 for frame buffer devices.
"append =" Add append options to brlilo.conf. If you are using a frame buffer device you could add something like video=matrox:vesa:402,depth:16.
"Kernel Module" Add the modules found in /lib/modules/kernel-version which are necessary for the Boot Method to work properly. If these modules aren't found in the modules directory it is assumed that they either are in the kernel or they do not exist. In the case of 2 disk compression, floppy needs to be included in the kernel or included as a module. Kmod inserts the modules, and kmod needs to be built into the kernel along with initrd and ramdisk."
"Kernel Version" Override the kernel version number found in the kernel header. This will change the /lib/modules/kernel-version directory.
System.map: When a non-running kernel is chosen it is important
to include a copy of that kernel's System.map file so that depmod can use
the correct set of kernel symbols to resolve kernel references in each
module. This can be found in the kernel's source code after
compilation.
Using the Advanced Root Section
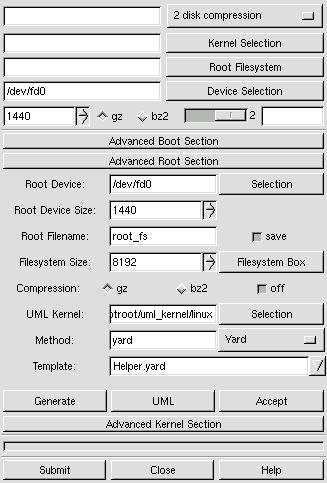 "Root Device" This is the device used for the root filesystem when
constructing the Boot/Root set. You may choose a device which is
different
than the Boot device, but presently only floppy devices are supported.
"Root Device" This is the device used for the root filesystem when
constructing the Boot/Root set. You may choose a device which is
different
than the Boot device, but presently only floppy devices are supported.
"Root Device Size" The size of the actual media used for the Root Device.
"Root Filename" The name give to the root filesystem when initially made in the temporary creation location. The save button allows the creation to be saved in the permanent default location when the Accept button is pressed.
"Filesystem Size" Root Methods make the filesystem the size which is specified here.
"Filesystem Box" Allows the filesystem type, uml behavior, and permissions to be controlled. There is a lot more information about this box in the "Filesystem Box" section.
"Compression" Off by default to allow user-mode-linux testing. Turn on compression when you are ready to use a Boot Method which requires compression.
"Method" The root filesystem creation method.
"Template" The template associated with a Root Method. Not all Root Methods have templates.
"Generate" This puts the chosen Root Method in action.
"UML" Abbreviation for user-mode-linux. This is a linux kernel which runs on top of the host system's linux kernel and allows a you run a live root filesystem.
"Accept" This accepts the created root filesystem if it is found in the temporary creation directory. The UML box and the main section will now reflect the path to this root filesystem. You can now test with the UML button or a put together a complete Boot/Root set with the Submit button.
User Mode Linux Box
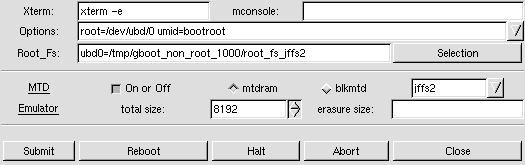
"Xterm" Choose an xterm with its executable options switch.
"mconsole:" Allow you to pass the help, sysrq, config, and remove commands to the mconsole to control the Linux virtual machine specified with the umid value. Good information about sysrq is found in Documentation/sysrq.txt in the Linux sources.
  sysrq (Shows sysrq option values in virtual machine.)
  sysrq [0-9|b|e|i|l|m|p|r|s|t|u]
  cad
  reboot
  halt
  config <dev>=<config>
  remove <dev>
  switch <umid>
  version
  help
"Options" Enter uml command-line options like: mem=64,
devfs=nomount. The umid option is used by
Reboot, Halt, and the mconsole to determine which Linux virtual machine is
running. The umid value may be changed by
altering the value for the switch option in the mconsole entry
box to allow control of a different Linux virtual machine.
  umid=bootroot
  mconsole:  switch bootroot2 [Enter]
  mconsole:  sysrq s sysrq u sysrq b [Enter]
  mconsole:  switch bootroot  [Enter]
"Root_Fs" Choose an uncompressed root filesystem. Append with ubd?=.
MTD Emulator
"On or Off" Turn MTD emulation on or off.
"mtdram" Use memory to emulate test mtd device.
"blkmtd" Use block device to emulate test mtd device.
"total size" Choose the total size for the mtd device.
"erasure size" Choose the erasure size for the mtd device.
Notes:
Lower Button Bar
"Reboot" Passes the reboot command to the mconsole to reboot the Linux virutal machine.
"Halt" Passes the halt command to the mconsole to halt the Linux virtual machine.
"Abort" Abort user-mode-linux kernel processes. Should be used as a last resort when Halt fails.
About the Yard Box
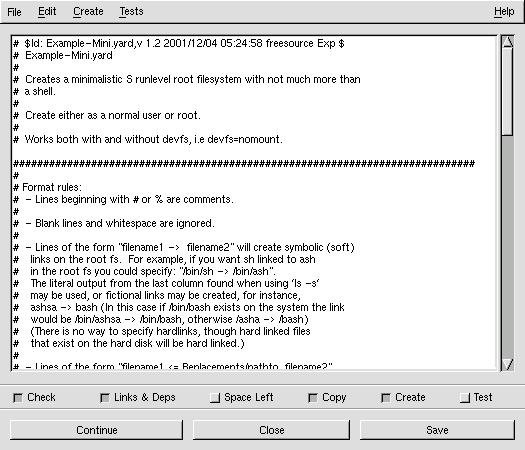
The check boxes at the bottom represent the different stages involved in creating a root filesystem. The behavior of these stages may be altered in three ways: Edit->Stages->one-by-one (default) will perform each stage sequentially, stopping between each stage, the user may continue the process by pressing the Continue button. Edit->Stages->continuous proceeds non-stop through all the stages. Edit->Stages->'user defined' allows the user to choose any stages the user wants, and will then proceed through all the chosen stages. Choosing only 'Check', 'Links & Deps', 'Copy', and 'Create' is a good example.
The behavior of some of the stages may be altered. For instance Alt-T allows you to choose which tests to run on the newly created root filesystem.

Press Alt-S to enable template text searching in either direction. Find exact matches or ignore case with the case sensitive check box.
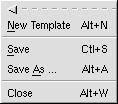
Use Ctl-S to save changes to a template, Alt-A to save the template with a new name, or Alt-N to create a new template. bOOTrOOT will not allow read-only templates (ex: Examples) or template links to be saved with their own name; after you make changes to these kind of templates, save them with a new name to preserve the changes.

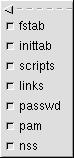
Edit->Setttings has two check boxes which allow you to turn on and off the automatic NSS and PAM configuration files parsing behavior described in detail in Example.yard and Example-Mini.yard.

Edit->Settings->Stripping allows you to turn off/on stripping for Libraries, Binaries, and Modules. --strip-all is the default for binaries and libraries, and --strip-debug is the default for modules; however libraries may be changed to --strip-debug in the settings.

Edit->Setting->Paths allows you to prepend a new search path to gbootroot's environment $PATH variable.

Edit->Replacements in your $HOME/.gbootroot/Replacements directory using an editor of your choice.
Create->Replacements creates special replacement files. Presently it creates a fstab configuration file as Replacements/etc/fstab.new in $HOME/.gbootroot/yard/.
Filesystem Box
The root_fs helper provides support for these commands:
mke2fs mkreiserfs mkcramfs genromfs mkminix
Notes:
1). All these commands may have options added, but it is unnecessary to add
directory, device, or source options 2).
Mkcramfs and genromfs use the filesystem given a
filename in the ARS as the source to produce another filesystem which is
named respectively with _cramfs or _romfs appended to the original name of
this filesystem.
If in doubt
what this all means, watch the verbosity box when the filesystem is created,
and things should become more clear.
 FAQ
FAQ
What's the advantage of using this program? [back]
BootRoot was the original program, but I decided that a GUI approach provided the user much more versatility and power in creating distributions. Since the first gBootRoot, bOOTrOOT has become a full blown distribution creation program which may be used by a normal user. It may be used for the creation of root filesystems in every imaginable application from Embedded Systems to Mini Distributions to Macro distributions to Full sized Distributions. The root and boot filesystems may be tested long before implementation by using user-mode-linux. Boot Methods are provided to allow root filesystems to run from different types of media. Historically, developers have written scripts which have focused on providing a particular type of root filesystem and boot method. Observation reveals that all these approaches share many commonalities. gBootRoot has been designed to embrace these similiarities, and to allow developers to create drop-in methods via modules or easy to understand templates. gBootroot is the GIMP of distribution creation!
How do I use gBootRoot? [back]
1. Download root_fs_tomrtbt_1.7.205.bz2 from user-mode-linux at Sourceforge to your $HOME/.gbootroot/root_filesystems.
2. bzip2 -dc root_fs_tomrtbt_1.7.205.bz2 > root_fs_tomrtbt_1.7.205.
3. Run gbootroot. Click on the Advanced Root Section (ARS), click on the UML button. Select root_fs_tomrtbt_1.7.205, add devfs=nomount to the options, and click on the Submit button.
4. Click on the Advanced Boot Section (ABS). Root_fs_tomrtbt is about 16M, so add ramdisk_size=16384 to the 'append=' entry. From the main box choose '2 disk compression', and press on the Root Filesystem button and select root_fs_tomrtbt_1.7.205.bz2.
5. Click the Submit button on the main box. Have two floppy disks ready.6. When you boot the boot disk you will see Lilo, you may access the menu using [Ctrl] and [Tab] to see the available images, or wait for the prompt to insert the root disk.
7. Download root_fs_debian_x11-(latest revision).bz2. Then follow the instructions in the first three steps, but don't add devfs=nomount. This root filesystem was created with the make_debian-X11 script from the make-debian-x11 add-on found at gbootroot's Sourceforge home.
8. Click on the ARS if its not already opened. Choose Yard from the Method pull-down menu. Choose Example-Mini.yard from the pull-down Template menu. Click on the Generate button. The Yard Box will pop up. Click on the Continue button until the Create check box turns off. You could continue to the tests, but they really wouldn't apply to this minimalistic example because there are no links or login type files in the template.
9. Experiment with Edit->Stages from the Yard Box menu. Try different types of staging behavior, and notice the differences.
10. Test your creation with the UML box as explained in step 3. You will want to add init=/bin/bash to the Options entry.
11. At this point you will probably want to play around a little bit. Familiarize yourself with the Format Rules found near the top of the template. You may want to save the template with a different name and experiment with changes, or create a new template using File->New (Shortcut: Alt-N).
12. Choose Example.yard from the Template menu in the ARS. Save it with a new name.
13. There are two types of inittabs provided for each major distribution type. The inittab with nodevfs appended doesn't use the device fs, i.e. the devfs=nomount kernel option. Uncomment the inittab, getty, and gettydefs (if required) for your distribution type. If you aren't using Debian make sure to comment (#) out the corresponding stuff for Debian.
14. Example.yard template introduces you to Replacements like the inittabs described above. Replacements can be anywhere and are specified in the template as either an absolute path or relative to $PATH (Edit->Settings->Path); the default path location for Replacements for users is $HOME/.gbootroot/yard/Replacements. Also, this template introduces you to links, $VERSION, how library dependencies are automatically figured for binaries and the automated approach for finding service modules and dependencies for PAM and NSS. Once you learn the format rules and how they are interpreted by the program you will find that making your own templates is quite simple.
15 Click on the Continue button until you finish the Space Left stage. Adjust the Filesystem Size in the ARS to a size larger than the Total space shown in the verbosity box. Create your root_fs, and make sure there was enough room left. You may have to adjust the size and run Create again if you are normal user, or run Copy and Create if a loopback device is being used as root.
16 Now that you have a root filesystem you may continue to the Test stage and observe what is missing. Next run the root_fs from the UML box. If things don't work correctly you will have to hunt down the cause, make the appropriate changes and proceed through the stages again. If you only make a change to a Replacement, you only have to run the Copy and Create stage again. If you make a change to the template you have to run at least the Check, Links & Deps, Copy, and Create stages again.
17. Now that you have successfully created a working mini distribution from Example.yard, re-create it with a different filesystem type: ext2, ext3, minix, reiserfs, romfs, cramfs, jffs, or jffs2.
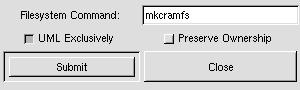
18. Open up the Filesystem Box (Edit->'File System") and click on
the UML Exclusively check button, and enter a filesystem command. For this
example mkminix will be used to create a minix filesystem.
Normal users will want to keep the Preserve Ownership check
button off. Press the submit button when finished.
19. Adjust the Filesystem Size in the ARS larger than 8192k, you could also make it smaller, but the point of this exercise is to introduce users to how the 8192k barrier of genext2fs can be exceeded.
20. Set the staging behavior to user defined, and choose the Create check button if you are a normal user or if you are root and created the root_fs in stages 12-16 with genext2fs, otherwise, root needs to choose the Check, Links & Deps, Copy, and Create check boxes. Press Continue and observe what happens. Do step 16.
21. Can we create a different filesystem type
for the root filesystem we just altered?
Enter genromfs to create a romfs filesystem.
Set the staging behavior to user defined if this hasn't already been done,
turn on the Create check button,
and press the Continue button. Assuming you've left the
ARS open, press the UML button so that the UML box closes and reopens, and you
will notice that your fs has _romfs appended to it. Try it out.
You may
notice complaints on boot-up about ioctl.save, to remove these complaints you
could create a replacement ioctl.save, edit and save the changes to the
template, re-create the filesystem, and test again.
22. So what about devices for normal users? Genext2fs creates devices for normal users, however, when UML Exclusively is used a normal user doesn't have the capability to copy over devices from the host system. Instead, devfs should be used. If more devices are required, devfsd can be used to set them up after the root filesystem is booted. Did you get things to work? Congratulations, you have created a root filesystem without needing to be root!
23. Now that you have done your homework, I set you free to create your own root filesystems from your own templates with replacements of your own choice. Create a root_fs which can fit on a block device, and then create an emergency disk customized for your own system, or create your own customized macro distribution and run it from the UML box to try things you never would have dreamed of doing on your host system. And that is just the beginning of the things you can do.
Oops, I can't get something to work, what should I do? [back]
If something isn't working for you, I want to know because you probably have found a bug. Don't fall into the trap that makes you believe that developers don't want to be deluged with bugs, quite to the contrary. developers love to receive bugs, and I heartily encourage all users to send Free Software developers all their problems. I have experience working in Quality Assurance, and I know that a program with the complexity of gbootroot is a perfect recipe for the existence of all types of bugs. As a developer focusing on the deployment of code it is easy for bugs to slip by unnoticed. Free Source software depends on users sending in bugs if the software is to ever experience rapid development; users shouldn't leave this process to the developers, because this guarantees that they will need to spend lots of time in the testing phase rather than spending time adding great new features.Testers Wanted! Big Reward!
Just because a project doesn't have a name like "Linux" doesn't mean that the project should live by itself without community support, so please send in those bugs. I consider a bug anything which effects the user negatively, whether it is a user interface (UI) which is hard to understand or use, documentation which seems misleading, or if the program doesn't seem to deliver results as it should. Even if you think your problem may be due to your own lack of understanding, I still recommend that you contact me after reasonable attempts, because what you may be experiencing is what "MANY" may be experiencing. At the bottom of this page is the contact information. Your problem will help gbootroot become a better program for all, and you will be a hero!
What are all these CVS directories doing in my replacements? [back]
CVS directories are deliberately put in the Replacement directories to prevent users from making changes to global replacement files. This allows developers who create add-ons (ex: make-debian-x11) to remain confident that any changes made to add-on replacements will remain available to all users. Replacements from add-ons are placed in the archictecture-independent /usr/share/gbootroot/yard/Replacements directory, and the archictecture-dependent /usr/lib/bootroot/yard/Replacements directory. When a user opens up gBootRoot, the program checks to see if there are any new replacements and then creates symlinks from the $HOME/.gbootroot/yard/Replacements directory to the replacement repositories. In general the repositories for replacements are owned by root, so normal users can't make changes to these files; however, when root is editing replacements in the $HOME Replacements location, it should be the administrator's policy to use an editor which respects versioned files (i.e. Emacs). Then the administrator will not be able to make any changes to the replacements repository because the CVS directories keep date information which prevents the editing of these files. The files kept in /usr/lib are usually binary files specific to the host architecture, where as the files linked from /usr/share are often text files compatible with any architecture; however, this directory is meant to be used for data which shouldn't be modified directly by any user (see FHS).
Note for users of version 1.2.14 or earlier: Verions of gbootroot before 1.3.0 didn't have this set-up, instead there were just copies of add-on replacements in the $HOME replacement directory to allow the user to directly modify add-on replacements. In order to get the full benefit of the new change you will need to rename any of the $HOME/.gbootroot/yard/Replacements you've modified and put them in a safe place, then remove the old replacements, and return the renamed replacements.
Can I use a program linked to uClibc in the template? [back]
Binaries are auto-magically checked to discover whether they require libc6 or uClibc. If they are found to require uClibc /usr/i386-linux-uclibc/bin/ldd is used to discover shared library dependencies, otherwise ldd is called without any path.
What do you mean by macro distribution? [back]A macro distribution is a term I coined. It implies a software distribution larger than a mini distribution usually associated with 1.44 to 1.722 sized floppy disks, but smaller than a base distribution which provides the foundation to create a full size distribution. It is usually pruned, and provides the absolute minimum needed to provide all the functionality usually associated with a full sized distribution, yet it still uses the same libraries and binaries. Because it can be made quickly, it is useful for creating a current snapshot of ones own host systems, and can be used to run experiments safely via user-mode-linux without fear of corrupting the host system.
How am I able to create root filesystems as a normal user? [back]Genext2fs is used to allow a normal user to create an ext2 filesystem with all UIDS and GIDS belonging to 0 (root) without the need for a loop or ram device. Device nodes are created from a device table file written to by gbootroot. This program is authored by Xavier Bestel, but the version used by gbootroot has modifications from Erik Andersen (BusyBox) to allow a device table to be used rather than a device listing. The maximum allowable size for a filesystem is 8192k. User and group information can be changed when the filesystem is run from a kernel.
How does this program allow a normal user to create a root filesystem larger than 8192k? [back]
Although genext2fs only allows a normal user to create a UID/GID 0 root filesystem up to a maximum size of 8192k, this program exceeds this barrier by taking advantage of the unique characteristics of user-mode-linux, allowing normal users to explore things they never could before. User-mode-linux is used to boot up a root_fs helper, the program then communicates with the user linux system via expect to automatically create a UID/GID 0 filesystem from the files copied over from the /tmp/gboot_non_root_`id -u`/loopback directory. The steps will vary slightly depending on which filesystem command is chosen, however, the same concept is used. You may apply this to filesystems smaller than 8192 by adjusting the settings in the Filesystem Box. If you want to learn how to do this manually, look at the ten steps below.
The root_fs helper used by gbootroot is completely root-free.
Ten steps to manually make a >8192 fs as a normal user.
1. You may want to create a helper root filesystem (<=8192k), and give it an unique name in the ARS Root Filename. The root_fs created from Example.yard provides all the functionality you need, regardless, you will need some sort of working root_fs with all the necessary system utilities before proceeding with the next step. We will call this root_fs_helper.
2. Create your root filesystem (>8192k) as you normally would when using genext2f, making sure to choose the filesystem size you require from the ARS. Proceed through the required stages, and when you finish the Create stage an ERROR dialog box will pop up saying "Cannot genext2fs filesystem" which you can safely ignore. At this point in the "echo /tmp/gboot_non_ root_`id -u`" directory there is an empty file with the name specified in the ARS Root Filename field which we will assume is called root_fs. Above this directory in loopback/ all files and directories copied over during the Create stage can be found.
3. Open up the UML box from the ARS. In the Root_Fs entry ubd0 should be pointing to the helper root_fs, and ubd1 should be pointing to the empty root_fs file:
ubd0=/tmp/gboot_non_root_1000/root_fs_helper ubd1=/tmp/gboot_non_root_1000/root_fs
4. The devfs is used in this example. Press the Submit button on the UML box, and login to the root_fs_helper. Create two mounting directories if they don't exist. For this example, /mnt1 and /mnt2 are used.
5. Make a filesystem type of your own choice on /dev/ubd/1:
mke2fs -m0 /dev/ubd/1
6. Mount /dev/ubd/1 on /mnt1:
mount /dev/ubd/1 /mnt1
7. Mount the host filesystem on /mnt2:
mount -t hostfs none -o /tmp/gboot_non_root_1000/loopback /mnt2
8. Copy everything from loopback to /mnt1:
cp -a /mnt2/* /mnt1
9. Change UIDs and GIDs to the appropriate user:
  chown -v -R 0:0 /mnt1
  chown -v -R 1002:1002 /mnt1/home/user
10. Unmount everything. Root_fs is now ready to be used!
How can I create boot disks as a normal user? [back]
Make the boot disk as you normally would. As long as you have write permissions to the boot device you shouldn't run into a problem. However, not all boot loaders can be set-up as a non-root user, but, you may still continue to the end of the process and set-up the boot loader later from a machine you have root access on. In order to use lilo while running gbootroot there are two prerequisites your administrator will have to establish for you. First, he will have to edit the fstab to allow you to mount a certain block device. For instance, to allow you to mount /dev/fd0, you have to mount the /tmp/gboot_non_root_mnt_`id -u` directory. If your UID is 1000, then a line like this is added to the fstab:
/dev/fd0 /tmp/gboot_non_root_mnt_1000 auto defaults,user,noauto 0 0
Next, the administrator needs to give you access to the lilo command. Sudo is a good solution, and in gbootroot the $main::sudo variable is assigned "sudo", this can be changed by the administrator to some other sudo-like program. The administrator then uses visudo to edit the sudoers file with a line like this:
user hostname = NOPASSWD: /sbin/lilo
Note that NOPASSWD is used. Gbootroot won't prompt for a password, and just assumes no password in necessary. I could change this behavior if people request it. If modules are required for the boot method to work properly, you need to have read permissions to them so they can be copied. Now a bootdisk with lilo can be made.
What is make_debian, and how do I use it? [back]
Make_debian is a script which takes information from a Debian installation and creates a template which can be used to make a macro distribution using gBootRoot's yard method. It creates replacements for important configuration files to represent the actual packaging state it will be providing. In order to use this script you need to be running a Debian-like distribution, anotherwards, one which uses dpkg, apt and file-rc to maintain its packaging and boot hierarchy. Dswim is used to collect information used in making the template. When you run the template in the Yard Box as a normal user make sure that UML Exclusively is on in the filesystem box, and that you assign an adequate filesystem size in the ARS. This is a good opportunity to find out how your installation would run on top of different filesystem types like reiserfs.
Run make_debian from the command-line. The script first finds all required packages on your host system, then it checks to see if any of the extra packages mentioned in its configuration are missing. As a rule, even if extra packages are missing, a working distribution will still be created. The script will then ask you a few questions, and then proceed to make Debian-`uname -n`.yard in your template directory.
Extra Packages and static template data:
You can resolve missing packages by installing them on your system, or you can
edit the script and replace those packages with a suitable replacement,
since you may be using a different version of Debian than the author
used when putting together make_debian. Make a copy of make_debian,
and then edit the part under EDIT HERE between qw().
You may edit the static data for the template within the script where it says
EDIT TEMPLATE BELOW.
The make-debian-x11 add-on is actually the
result of
making these modifications. First, extra packages were
added, second, extra replacements were provided and the static information
in the template was modified to reflect these replacements.
When you start a kernel image with 1, you are telling it to start in runlevel 1, not in single mode. Use "single" instead.
While on the subject, it should be pointed at the setting up init and its runlevels is one of the most challenging areas of creating a bootable root_fs. Often your creation will only work with "single" until all the conflicts are resolved. Things are complicated even futher by the fact that devices can now be set up in two majors ways: tty? or ttys/? (devfs). Fortunately, user-mode-linux comes in very handy for hunting down all the bugs.
What does the 2 disk compression method do? [back]
This Boot Method creates a boot disk with lilo, a kernel and an initrd image. The initrd script mounts another root disk with a compressed (gzip or bzip2) filesystem. Note: This method doesn't use the devfs, so use a kernel without this built into it.
I've created a root fs. Then I've tried to create the boot disk using the 2 disk compression method. The device selection is /dev/fd0, size is 1440k, but the initrd_image.gz is 715k. I don't know much about boot disks but shouldn't the boot disks contain mainly the kernel? [back]
If you are creating a boot disk in which the kernel knows where to find the root filesystem and the root filesystem is either compressed with gzip or not compressed (i.e. a cramfs could be used), then nothing else but a kernel is required assuming it is copied in a way that is starts at block 0 on the device media, and then rdeved in such a way that it knows that the ramdisk and the prompt flag are on, i.e., rdev -r /dev/fd0 49152, and that the root filesystem starts at block 0 on the other floppy. However, the 2 disk compression method was designed to uncompress bzip2 root filesystems as well as gzipped root filesystems from to the second disk. In order to boot /dev/fd0 from /dev/fd0 when the root filesystem is compressed with bzip2 the kernel has to mount the initial boot disk, and then after the new root disk is inserted it uncompresses the root filesystem and then changes over to the real root device, which in this case is /dev/ram1 where the uncompressed filesystem now resides. In order to accomplish this a customized ramdisk called an initrd is required. Initial ram disks are essentially mini filesystems with the bare necessities to allow a special init type file called linuxrc to perform similar types of duties as an init, but in a much more esoteric fashion than an init. During a kernels initrd stage it looks for linuxrc, and during normal boot it looks for init or a specified init passed as an option to the kernel.
So you are probably wondering what all this has to do with the large initrd size when using the 2 disk compression method. Linuxrc can be anything from a statically-linked executable to a script which requires the dynamically-linked ash executable. In the case of the 2 disk compression method, the later method is employed, and this uses information found directly from your host system. You may have noticed the libraries required by ash found from your host system can be quite large even after being stripped assuming you are using a major distribution or derivative of one. The advantage of a two disk boot/root system is related to the fact that modern kernels are themselves quite large, leaving very little room for a root filesystem, but at the same time it is convenient to have a boot loader like lilo because it allows you to boot other root filesystems which is useful in emergency situations. The present ABS (boot section) is descended from some pretty old historic code from the original bootroot and is due for a major upgrade to allow a lot more flexibility in creating streamlined boot disks from a variety of user definable methods. Unfortunately (or fortunately for root filesystem making, a process which used to take days), I've been devoting a lot of time to the ARS, but hopefully I'll be adding major changes to the ABS in the near future.
If libc is included in the boot disk, why is it needed in the root disk as well? [back]
An interesting question. Let's consider the two disk compression method, first the initrd is decompressed into /dev/ram0 or /dev/rd/0, then the root filesystem is decompressed into /dev/ram1 or /dev/rd/1, even though one would think since everything is being done in memory, the prescence of the libraries would remain in memory. But, in this case memory is partitioned and the new root device doesn't share information with the previous root device. An easier way to look at this is simply that a new root is being used which doesn't share information with the previous root. You can experiment with this by removing libc-*.so and ld-*.so from a root filesystem which previously worked, first test it with UML, and then try to boot it; in both cases it won't work.
So if I understand correctly, it is not possible to copy libc from /dev/ram0 to /dev/ram1 before mounting /dev/ram1 as / ? [back]
Actually, this could be accomplished before the change_root or pivot_root
call, however, there is a much easier solution.
Make a working root
filesystem, edit it either on a loop device as root, or on a different
ubd?=root_fs as any user from a Linux virtual machine.
Add an initrd
device to the mounted filesystem with mknod initrd b 1 250
in the /dev
directory.
Make a directory called /initrd.
Delete libc*so and then
ln -sf /initrd/lib/libc(real version)so libc(real version)so.
Umount, compress, and copy
over to your root disk (2 disk compression method - make sure compression
and filesystem name match).
The reason why this works is that the initrd
remains mounted if /dev/initrd and the directory /initrd exist on the root
filesystem after the root change.
Ofcourse, you won't be able to run the
filesystem without the initrd, but this is another great way to save
space.
There isn't enough room left on my 1440 floppy to make a Boot or Root disk. Is there any way to free up more space apart from reducing the size of the kernel? [back]
Move the device size to 1722. This is a trick that tomsrtbt uses on his famous rescue disk.
(Update 10/06/2001)
Up until mke2fs version 1.19 you were able to do
`mke2fs -F /dev/fd0 1722` on a 1440 device without any problem, but since
then mke2fs has become much more particular about enforcing actual device
size. . Mke2fs will complain:
"mke2fs: Attempt to write block from filesystem resulted in short write zeroing block 1600 at end of filesystem."
I understand Theodore Ts'o reasoning for doing this, but I strongly believe that the old behavior was very useful for people creating mini-distributions so I have issued Feature Request #468652 at e2fsprogs site at Sourceforge. It should be noted that fdformat is an unacceptable solution because it tends to be machine specific, and the original mke2fs behavior made floppies that worked everywhere. Feel free to add your comments to the Feature Request. Thanks.
Last, but not least...the boot disk boots, waits for the root disk, and now fails. "Can't open console"??? or sth like this (I'm pretty tired right now, recheck later), which appears after "VFS:ext2fs was found..." [back]
This is an easy one. First, make sure that there is a /dev directory in your root filesystem. Genext2fs will automatically make this from its devices table, but other fs creators (mke2fs) don't know any better. Second, does your kernel have devfs? Based on this answer, make sure you choose the proper inittab for your kernel, and if you aren't using devfs make sure that the proper devices are included. The minimum required is /dev/console and you will need devices for anything listed in the inittab. Genext2fs will include devices for any user, but non-root users can't create devices with other filesystem creators. Third, test with UML, if the filesytem is not devfs use the devfs=nomount option to make sure your filesystem is running properly.
What are the kernel's drivers/fs that must be directly compiled, not as modules, except ext2, floppy? Could you attach your kernel's .config? [back]
I don't want to take all the fun away from you. However, floppy can be a module for the two disk compression method. Boot methods automatically check for the existence of required modules, otherwise, they are assumed to be part of the kernel. If you peruse the verbosity box the required modules are revealed. INITRD and BLK_DEV_RAM should be in the kernel if an initrd is being used. In general, if an initrd or root filesystem require a certain filesystem type, that filesystem type needs to be built into the kernel, and can't be a module. There is a config for the uml kernel in /usr/lib/bootroot/yard/Replacements/lib/modules. If you get it running with uml, and it doesn't run with your own kernel, take a look here.
What is the root_fs_helper 2Mb file in the grootboot package? [back]
This is the ultimate in root filesystem engineering. The root filesystem helper is actually a much bigger filesystem made with cramfs, and it originated from a genext2fs filessytem made as a normal user. It includes utilities like filesystem creators. It is part of the automated filesystem creation system, and after it is booted by uml, it is intereacted with via expect based on user choices placed in the filesystem box. Considering that mkreiserfs doesn't allow loop devices to be used, this is an easy way to get around this limitation, and most importantly it allows non-root users to create UID/GID 0 root filesystems. Try creating a root filesystem as a normal user with both "UML Exclusively" and "Preserve Ownership" turned on and discover if you can successfully create a working root filesystem. Answer: No, you will not be able to unless Preserve Ownership is off.
Now the creation works, but actually the whole image is less than 1440k... Still, unclear to me is the purpose of the device/size in the main widget - is it only for the boot or also for the root disk? After all, the root fs image size has been already entered in the ARS. [back]
Gbootroot is designed with the idea that new Linux users don't need to open up the ARS or ABS; basically, they just choose a boot method, provide a pre-made compressed root_fs and kernel, and then press the submit button to get a two disk floppy system. What this means is that if the ARS is never opened then the boot and root devices will both be /dev/fd0. But, if the ARS is opened up, then the boot device is whatever is found in the main section, and the root device is whatever is found in the ARS. Likewise, if the ABS is opened up, and the user decides that they would like to do development work on a different device than the boot device, for instance, /dev/fd1, then they can change the device in the ABS. In this case, the device should be left to /dev/fd0 in the main section, unless you have one of those amazing Bioses which allow /dev/fd1 to be booted. At a later date the user can run "lilo -v -C brlilo.conf -r /mnt" where /mnt represents the mounted device provided in the main section.
gBootRoot doesn't start because it can't locate Gtk.pm? [back]
This program requires Gtk-Perl available from CPAN, Freshmeat or most GNU/Linux distributions.
If you roll the floppy density counter down to 0 and then try go back up towards 1440 and 1722, you get very funny figures. [back]
This is because of the way Gtk works. There are two adjustments, step and page increments. When you press your first mouse button the step has been set to 282 so that a person can easily switch between 1440 and 1722. When you use your second mouse button the page is set at 360. You can go down to zero by pressing your third mouse button on the down arrow. Now page up with the second button to 1440 and step with the first button to 1722. Pretty cool, eh?
While we are on this subject please check out these keyboard shortcuts for Gtk.
Motion Shortcuts
Editing Shortcuts
Selection Shortcuts
Changing from gz to bz2 compression for the boot image in the main section has no effect and gzip is still exectuted. [back]
In the main section to two check boxes are just indicators of what compression has been used on the root filesystem. Gz if gzipped, and bz2 in bzip2ed, and gz if uncompressed. Usually, the compression is auto-detected, but if it isn't you can manually choose the compression type, or override the real compression type. In the ARS you can actually compress a root filesystem after it has been created by turning compression on, choosing a compression type, and pressing the Accept button. Basically, the main section just assumes you already have a compressed filesystem, this will change in the future; however, actual compression is done either in the ABS (not yet) or the ARS, the main section is just used to put together the parts.
